Create a Sample Application That Uses ScalarDB SQL (JDBC)
This sample code is now deprecated. To use ScalarDB SQL, you need to use ScalarDB Cluster, which is available only in the Enterprise edition. For more information, see ScalarDB Cluster.
This tutorial describes how to create a sample e-commerce application that uses ScalarDB SQL (JDBC).
Overview
The sample e-commerce application shows how users can order and pay for items by using a line of credit. The use case described in this tutorial is the same as the basic ScalarDB sample but uses ScalarDB SQL (JDBC).
The database that you will be using in the sample application is Cassandra. Although Cassandra does not provide ACID transaction capabilities, you can make transactions ACID compliant by having your application connect to the database through ScalarDB SQL (JDBC).
Since the focus of the sample application is to demonstrate using ScalarDB SQL (JDBC), application-specific error handling, authentication processing, and similar functions are not included in the sample application. For details about exception handling in ScalarDB SQL (JDBC), see Handle SQLException.
What you can do in this sample application
The sample application supports the following types of transactions:
- Get customer information.
- Place an order by using a line of credit.
- Checks if the cost of the order is below the customer's credit limit.
- If the check passes, records the order history and updates the amount the customer has spent.
- Get order information by order ID.
- Get order information by customer ID.
- Make a payment.
- Reduces the amount the customer has spent.
Prerequisites
- One of the following Java Development Kits (JDKs):
- Oracle JDK LTS version (8, 11, or 17)
- OpenJDK LTS version (8, 11, or 17)
- Docker 20.10 or later with Docker Compose V2 or later
We recommend using the LTS versions mentioned above, but other non-LTS versions may work.
In addition, other JDKs should work with ScalarDB, but we haven't tested them.
In addition, you need access to the ScalarDB SQL repository on GitHub and the packages in the ScalarDB SQL repository, which are private. The packages and repository are available only those who are using ScalarDB Enterprise. If you need a license for ScalarDB Enterprise, please contact us.
After confirming that you have access to the ScalarDB SQL repository and its packages, you will need to set your GitHub username and your personal access token. To specify these properties, you can do one of the following:
- Add to Gradle properties via Terminal
- Add as environment variables
Specify the properties with the -P option by running the ./gradlew command as follows, replacing <YOUR_GITHUB_USERNAME> with your GitHub username and <YOUR_PERSONAL_ACCESS_TOKEN> with your personal access token:
$ ./gradlew run <OPTIONS> -Pgpr.user=<YOUR_GITHUB_USERNAME> -Pgpr.key=<YOUR_PERSONAL_ACCESS_TOKEN>
Specify the properties as environment variables by running the following commands, replacing <YOUR_GITHUB_USERNAME> with your GitHub username and <YOUR_PERSONAL_ACCESS_TOKEN> with your personal access token:
$ export USERNAME=<YOUR_GITHUB_USERNAME>
$ export TOKEN=<YOUR_PERSONAL_ACCESS_TOKEN>
For more details, see how to install ScalarDB SQL.
Set up ScalarDB SQL (JDBC)
The following sections describe how to set up the sample e-commerce application.
Clone the ScalarDB samples repository
Open Terminal, then clone the ScalarDB samples repository by running the following command:
$ git clone https://github.com/scalar-labs/scalardb-samples
Then, go to the directory that contains the sample application by running the following command:
$ cd scalardb-samples/scalardb-sql-jdbc-sample
Start Cassandra
Cassandra is already configured for the sample application, as shown in scalardb-sql.properties.
To start Cassandra, which is included in the Docker container for the sample application, make sure Docker is running and then run the following command:
$ docker-compose up -d
Starting the Docker container may take more than one minute depending on your development environment.
Load the schema
The database schema (the method in which the data will be organized) for the sample application has already been defined in schema.sql.
To apply the schema, go to the ScalarDB SQL Releases page and download the CLI tool (scalardb-sql-cli-<VERSION>-all.jar) for the version of ScalarDB SQL that you want to use to the scalardb-samples/scalardb-sql-jdbc-sample folder.
Then, run the following command, replacing <VERSION> with the version of the ScalarDB Schema Loader that you downloaded:
$ java -jar scalardb-sql-cli-<VERSION>-all.jar --config scalardb-sql.properties --file schema.sql
Schema details
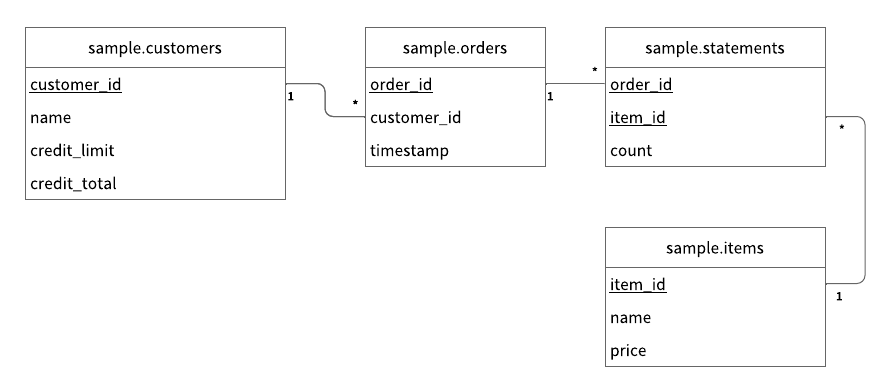
As shown in schema.sql for the sample application, all the tables are created in the sample namespace.
sample.customers: a table that manages customers' informationcredit_limit: the maximum amount of money a lender will allow each customer to spend when using a line of creditcredit_total: the amount of money that each customer has already spent by using their line of credit
sample.orders: a table that manages order informationsample.statements: a table that manages order statement informationsample.items: a table that manages information of items to be ordered
The Entity Relationship Diagram for the schema is as follows:
Load the initial data
After the Docker container has started, load the initial data by running the following command:
$ ./gradlew run --args="LoadInitialData"
After the initial data has loaded, the following records should be stored in the tables.
sample.customers table
| customer_id | name | credit_limit | credit_total |
|---|---|---|---|
| 1 | Yamada Taro | 10000 | 0 |
| 2 | Yamada Hanako | 10000 | 0 |
| 3 | Suzuki Ichiro | 10000 | 0 |
sample.items table
| item_id | name | price |
|---|---|---|
| 1 | Apple | 1000 |
| 2 | Orange | 2000 |
| 3 | Grape | 2500 |
| 4 | Mango | 5000 |
| 5 | Melon | 3000 |
Execute transactions and retrieve data in the sample application
The following sections describe how to execute transactions and retrieve data in the sample e-commerce application.
Get customer information
Start with getting information about the customer whose ID is 1 by running the following command:
$ ./gradlew run --args="GetCustomerInfo 1"
You should see the following output:
...
{"id": 1, "name": "Yamada Taro", "credit_limit": 10000, "credit_total": 0}
...
Place an order
Then, have customer ID 1 place an order for three apples and two oranges by running the following command:
The order format in this command is ./gradlew run --args="PlaceOrder <CUSTOMER_ID> <ITEM_ID>:<COUNT>,<ITEM_ID>:<COUNT>,...".
$ ./gradlew run --args="PlaceOrder 1 1:3,2:2"
You should see a similar output as below, with a different UUID for order_id, which confirms that the order was successful:
...
{"order_id": "454f9c97-f456-44fd-96da-f527187fe39b"}
...
Check order details
Check details about the order by running the following command, replacing <ORDER_ID_UUID> with the UUID for the order_id that was shown after running the previous command:
$ ./gradlew run --args="GetOrder <ORDER_ID_UUID>"
You should see a similar output as below, with different UUIDs for order_id and timestamp:
...
{"order": {"order_id": "454f9c97-f456-44fd-96da-f527187fe39b","timestamp": 1685602722821,"customer_id": 1,"customer_name": "Yamada Taro","statement": [{"item_id": 1, "name": "Apple", "price": 1000, "count": 3},{"item_id": 2, "name": "Orange", "price": 2000, "count": 2}],"total": 7000}}
...
Place another order
Place an order for one melon that uses the remaining amount in credit_total for customer ID 1 by running the following command:
$ ./gradlew run --args="PlaceOrder 1 5:1"
You should see a similar output as below, with a different UUID for order_id, which confirms that the order was successful:
...
{"order_id": "3f40c718-59ec-48aa-a6fe-2fdaf12ad094"}
...
Check order history
Get the history of all orders for customer ID 1 by running the following command:
$ ./gradlew run --args="GetOrders 1"
You should see a similar output as below, with different UUIDs for order_id and timestamp, which shows the history of all orders for customer ID 1 in descending order by timestamp:
...
{"order": [{"order_id": "454f9c97-f456-44fd-96da-f527187fe39b","timestamp": 1685602722821,"customer_id": 1,"customer_name": "Yamada Taro","statement": [{"item_id": 1, "name": "Apple", "price": 1000, "count": 3},{"item_id": 2, "name": "Orange", "price": 2000, "count": 2}],"total": 7000},{"order_id": "3f40c718-59ec-48aa-a6fe-2fdaf12ad094","timestamp": 1685602811718,"customer_id": 1,"customer_name": "Yamada Taro","statement": [{"item_id": 5, "name": "Melon", "price": 3000, "count": 1}],"total": 3000}]}
...
Check credit total
Get the credit total for customer ID 1 by running the following command:
$ ./gradlew run --args="GetCustomerInfo 1"
You should see the following output, which shows that customer ID 1 has reached their credit_limit in credit_total and cannot place anymore orders:
...
{"id": 1, "name": "Yamada Taro", "credit_limit": 10000, "credit_total": 10000}
...
Try to place an order for one grape and one mango by running the following command:
$ ./gradlew run --args="PlaceOrder 1 3:1,4:1"
You should see the following output, which shows that the order failed because the credit_total amount would exceed the credit_limit amount:
...
java.lang.RuntimeException: Credit limit exceeded
        at sample.Sample.placeOrder(Sample.java:184)
        at sample.command.PlaceOrderCommand.call(PlaceOrderCommand.java:32)
        at sample.command.PlaceOrderCommand.call(PlaceOrderCommand.java:8)
        at picocli.CommandLine.executeUserObject(CommandLine.java:2041)
        at picocli.CommandLine.access$1500(CommandLine.java:148)
        at picocli.CommandLine$RunLast.executeUserObjectOfLastSubcommandWithSameParent(CommandLine.java:2461)
        at picocli.CommandLine$RunLast.handle(CommandLine.java:2453)
        at picocli.CommandLine$RunLast.handle(CommandLine.java:2415)
        at picocli.CommandLine$AbstractParseResultHandler.execute(CommandLine.java:2273)
        at picocli.CommandLine$RunLast.execute(CommandLine.java:2417)
        at picocli.CommandLine.execute(CommandLine.java:2170)
        at sample.command.SampleCommand.main(SampleCommand.java:35)
...
Make a payment
To continue making orders, customer ID 1 must make a payment to reduce the credit_total amount.
Make a payment by running the following command:
$ ./gradlew run --args="Repayment 1 8000"
Then, check the credit_total amount for customer ID 1 by running the following command:
$ ./gradlew run --args="GetCustomerInfo 1"
You should see the following output, which shows that a payment was applied to customer ID 1, reducing the credit_total amount:
...
{"id": 1, "name": "Yamada Taro", "credit_limit": 10000, "credit_total": 2000}
...
Now that customer ID 1 has made a payment, place an order for one grape and one melon by running the following command:
$ ./gradlew run --args="PlaceOrder 1 3:1,4:1"
You should see a similar output as below, with a different UUID for order_id, which confirms that the order was successful:
...
{"order_id": "fb71279d-88ea-4974-a102-0ec4e7d65e25"}
...
Stop the sample application
To stop the sample application, stop the Docker container by running the following command:
$ docker-compose down